Wednesday 18 June 2014

Berthoud stainless steel mudguards (fenders)

as you may have noticed,  i use Gilles Berthoud  stainless steel mudguards , apart from the chrome like shininess of them , they dont rot , if they get any tarnish you just give them a quick rub up with some metal polish and they are all good . They are light weight  , they dont flap around or rattle like plastic guards tend to and you can also use them as the anchor point for constructeur style rear rack fitting like i have on the stratton , i have had 25 kilos on the rear rack and it hardly flinched .
 They are available in several widths in both long and short versions, i only use the long versions . Ii use the 40mm width items as the widest tyres i use are 35c and the narrowest are 28c and the chainstays on my bike wont accept any wider anyway.
Lately i have been looking at a new frame and fork from soma fabrication  , their randonneur and the new Reno Rambler , either way i will need some 60mm guards , there are also those from Velo Orange , they are very pretty and the mounting hardware is more rugged but they cost a lot and are never in stock in the correct width when i have went to buy them !

The Stratton on the Union Canal in Edinburgh .

Wednesday 14 May 2014

randonneur handlebar and saddle bags

the Velo Orange Campaign bag ,
still my fav front bag , it has a few issues but they can be circumvented with comparative ease ,


infinitely useful and well put together i never ride without it , i made a stiffener for the back of the bag to give a solid fixing for the Decaleur,,  the canvas is a bit thin but with all the trim it is pretty though, the only point of wear is in the base where it rubs the rack , i simply stitched a bit of leather to the base (you could also rivet on a bit too, to save the sewing ) , i have read much about these bags having rusty fittings , the fast fix for this is to spray them with nikwax leather and canvas spray on protector , my bag has been soaked a few times and as yet the buckles are all shiny silver ,
i use the shoulder strap fed under the bag to hold it down , simple ,effective and fast to release when i go walkabout.

the Iron Weed Orpington ,

nice bag , very well made and a great price considering it is hand made in the USA , however at this price dont expect any leather trim or strapping , this bag would be the ultimate camera bag with the correct foam insert , i am currently doing a little work to the Iron Weed Orpington bag as it needed a few mods such as a leather trim around the lid as it was never a great fit , the trim strip will also double as a 'D' lock holster ! , i may replace the strapping with leather too but i will do the trim first while i think about it a bit .


i have fitted elastic closures on the rear pockets as the silly metal twist locks belong on handbags ,not randonneur bags , they are the most rattly things i have experienced , worse than a loose mudguard , the leather trim strap is only fixed at the corners to allow jackets and jerseys to be tucked in , if you look at the right on the bag the strap is a loose fit , this to allow a 'D' lock to be dropped in , i have still to add a stiffener to the top of the bag as water has a habit of pooling up on top of the bag ! not so good , i will form one from plastic with a little heat to give a slightly convex profile that should encourage the water to run off .

why handlebar bags?
for me it has become indispensable for carrying a waterproof, spare tube, patch kit , tyre lever, muti tool, keyes, phone , lights etc, etc.  one very good reason is for carrying the ever important performance enhancing drug that is coffee . picture this , you are 50 miles from home , the nearest coffee shop is about an hour away and the need for a coffee fix is taking up way to much space in your head . what do i do? i simply apply the brakes at the first spot that looks like a nice spot to take a break , open the bar bag and pull out the essential Esbit coffee maker .


The old KP (Karrimor Product) saddlebag ,
i got it from a friend , he came by it when he bought an old 10 speed that it was hanging from,
it is the same size as a Carradice Cadet , it has only a single compartment and doesnt even have a safety gator and drawstring . The strapping was all nylon webbing in pale blue ,

  as you may have observed ,i have started replacing the straps with leather , i have kept the original metal work as these old Karrimor bags have superb buckles that are extremely fast to open and close , they can be opened with one hand in a couple of seconds ,
  just like the Carradice cadet it rolls up into a sausage , while replacing the straps i cut them 5" longer so that they can also double as the roll up straps rather than the old toe straps i usually use ,
 the corner rivets were replace with M5 countersunk A4 grade stainless nuts and bolts that will not rust and look quite nice too .


i will be replacing the saddle loop straps soon as i have enough left over strapping .


Thursday 10 April 2014

buying a vintage bicycle frame

hello all,
 this post is written to try and share little of my hard and often expensively earned knowledge of buying and running vintage bicycle frames , it is never intended as a hard and fast rule book,
 there are many things to consider when venturing into the world of vintage bikes , the first and most obvious is sizing , as in rider fit and parts fit , only you can decide what the right size is  to fit you , but bare in mind that you may spot a handsome frame that is vertically the correct size but it may have an abnormally long top tube , this was actually quite common back in the 50's and 60's , a tight or steep head angle was often coupled to a slack or shallow seat angle , this means the saddle needs to be slid quite far forward on its rails and coupled to a short stem to get the cockpit to a comfortable length . the described set up is exactly what my higgins ultralight has ,
it has a 75° head angle with 71° seat angle  , i have a 100mm stem and short reach(70mm)  short drop bars with my saddle all the way forward , my flying scot continental has a similar set up , if a frame has similar angles then check the forks are of the correct rake or off set , the steeper the head angle the greater the fork rake must be to maintain stability .

rear end spacing ,
this varies a lot , 110 120  126 130 , to name a few , while most frames can be manipulated in or out a few mm i wouldn't go pulling a 110mm frame over a 135 hub ,  not only does it stress the frame and dropouts it can also damage the rear hub axle by bending it ,  drop outs can have slots cut specifically for a certain hub such as a sturmey archer , trying to get a 10mm axle in will usually involve a bit of filing , front drop outs on old forks can have 5/16 slots , a modern 9mm axle wont go in them , if you decide to file the dropout be methodical, if you file only the back edge of the slot on front dropouts you wont effect the strength or alignment , if you do both sides of one drop out you must then do the same on the other dropout , take your time and consider that once it has been removed it cant easily go back on.

wheel sizing , 
26x1 3/8
26x1 1/2
27x1 1/4
etc
i choose frames that will convert easily to 700c , brake drop and clearance are the major concerns , 26x1 1/4 fit frames can usually take a 700c with shorter drop brakes and narrower tyres without issue , the bottom bracket height does rise a little though and mudguard clearance can become difficult, 
27" wheel frames can also be converted easily , these are great with 700c wheels if you plan to run big tyres just as i do on my old Vindec SW special ,

cable stops and gear bosses , 
a lot of old frames have no fittings at all so clip on stops etc must be used , a few of my bikes have one gear lever boss so alternative mountings and guides must be used to run a multiple chainwheel set up .

hidden damage 
after 60+ years of probable abuse and hard riding you can expect to find small issues that will need attention ,as an example here is a pic of the small cracks i found in the Nervex lugs on my vindec,

these are small and are only in the lugs, both top and bottom of the head tube ,  the actual tubes still seem fine , the cause of these cracks is known to me as the frame had over sized 30.5mm cups pressed in when i got it,  i will be fixing these small issues by doing a bit of filling with some bronze , this sort of cracking is rather typical for the old Nervex lightweight lugs , 
its things like this that make me stay away from so called 'restored' frames as a nice new paint job can hide a plethora of damage , i once had a customer with a beautiful scot continental , but it weighed a ton, after inspection i found that the fork and frame had lots of holes that had been filled with bronze brazing which had doubled the frame weight and destroyed the ride quality , i also found that there was a lot of car body filler !

bottom bracket shells
i couldnt even begin to count the number of nice old  frames i have seen being built up by young ,enthusiastic guys and girls at my old place of work that were assembling vintage frames into fixed gear street machines , only to have them shout me over for help as the bottom bracket wont screw in , when i have a look they are trying to ram in an italian bb into an english shell or they have wound in the non drive cup into the drive side , there are bottom brackets available that called threadless BB's to sort out damaged shells, another quick and dirty fix is to flow some bronze into the stretched shell and then re-cut the threads , if you do this i would strongly recommend you use a cartridge type BB , they are far better at not stressing the shell edges.
some vintage bikes have odd width shells , my scot continental has a 64mm wide shell , finding a cup and cone bb set to fit it is next to impossible , i ran a shimano cartridge item but still used a lockring on the non drive side so it looks correct, 

chain stays and seat stays ,
these can look fine on the outside but be rotten and rusty on the inside , always check inside the chainstays , seat tube and downtube at the bb junction , carry a small torch when going to view a frame you may intend buying . 

seat lug's , 
these can stretch over many years of use and tightening ,  check that they are in a good usable state as they can be costly to sort out , 

more soon ;-)

Tuesday 1 April 2014

the pink pig


i have wanted a Higgins ultralight for years but they are very rare , then a week ago i spotted a 23" ultralight on Hilary Stones website, a very very pink one at that   :-) ,
i had a Higgins ultralight when i was 16 , it was given to me by a customer at the shop i worked at the time , it was small and 26" wheeled so i grew out of it pretty quickly , Higgins was a rather talented engineer that ,from what i can glean from the net, primarily made frames for lightweight tricycles for adults that for one reason or another (post war vets with various injuries ) couldn't ride a standard bicycle but still wanted a lightweight , 'quick feeling' trike , he also made a few bicycle frames for road ,track and touring , i believe he used various types of tubing , the pink pig has a plain gauge seat tube with butted stays and top and down tube , the frame is very compliant and soft feeling on the rough  but has great power transfer  and acceleration and never rubs its tyres on the stays or brakes , for me its perfect for those long rides with the very occasional turn of speed ,
dated 8/7/50 , fully fillet brazed frame ( as were most Higgins ultralight's  it would seem )  , i assume  it is made from Reynolds tubing ,although it has 'higher pitch and more sustained tone' ,sound when gently tapped and has a slightly less damped ride feel compared to another frame ( the old vindec Speedwing special) which has exactly the same external gauge of tubes and is only one year older than the Higgins and is all 531 butted  , it could be a different type such as Accles and Pollock Kromo front triangle with Reynolds rear end mix or just the fillet brazed vs lugged construction differences that i am feeling and hearing.
 The drop outs are cyclo standard items without hanger , common back then for Sturmey Archer or 3/4/5 speed dérailleur gear use , the rear end is 120 mm but i have it pushed out a touch to 126 mm to allow the sachs 7 speed freewheel to be used .
 yes, its pink , really really PINK ! 
Thats how i got it ,however the frame is nice and straight and apart from a slightly stretched bottom bracket shell on the non drive side (which  i circumvented with the use of a un92 bb (the un 72 has the same deep thread cups ) which has very deep fitting cup that easily goes past the stretched section as vintage 3 piece cup and axle system had rather shallow cups so only a small section of the shell is stretched   )
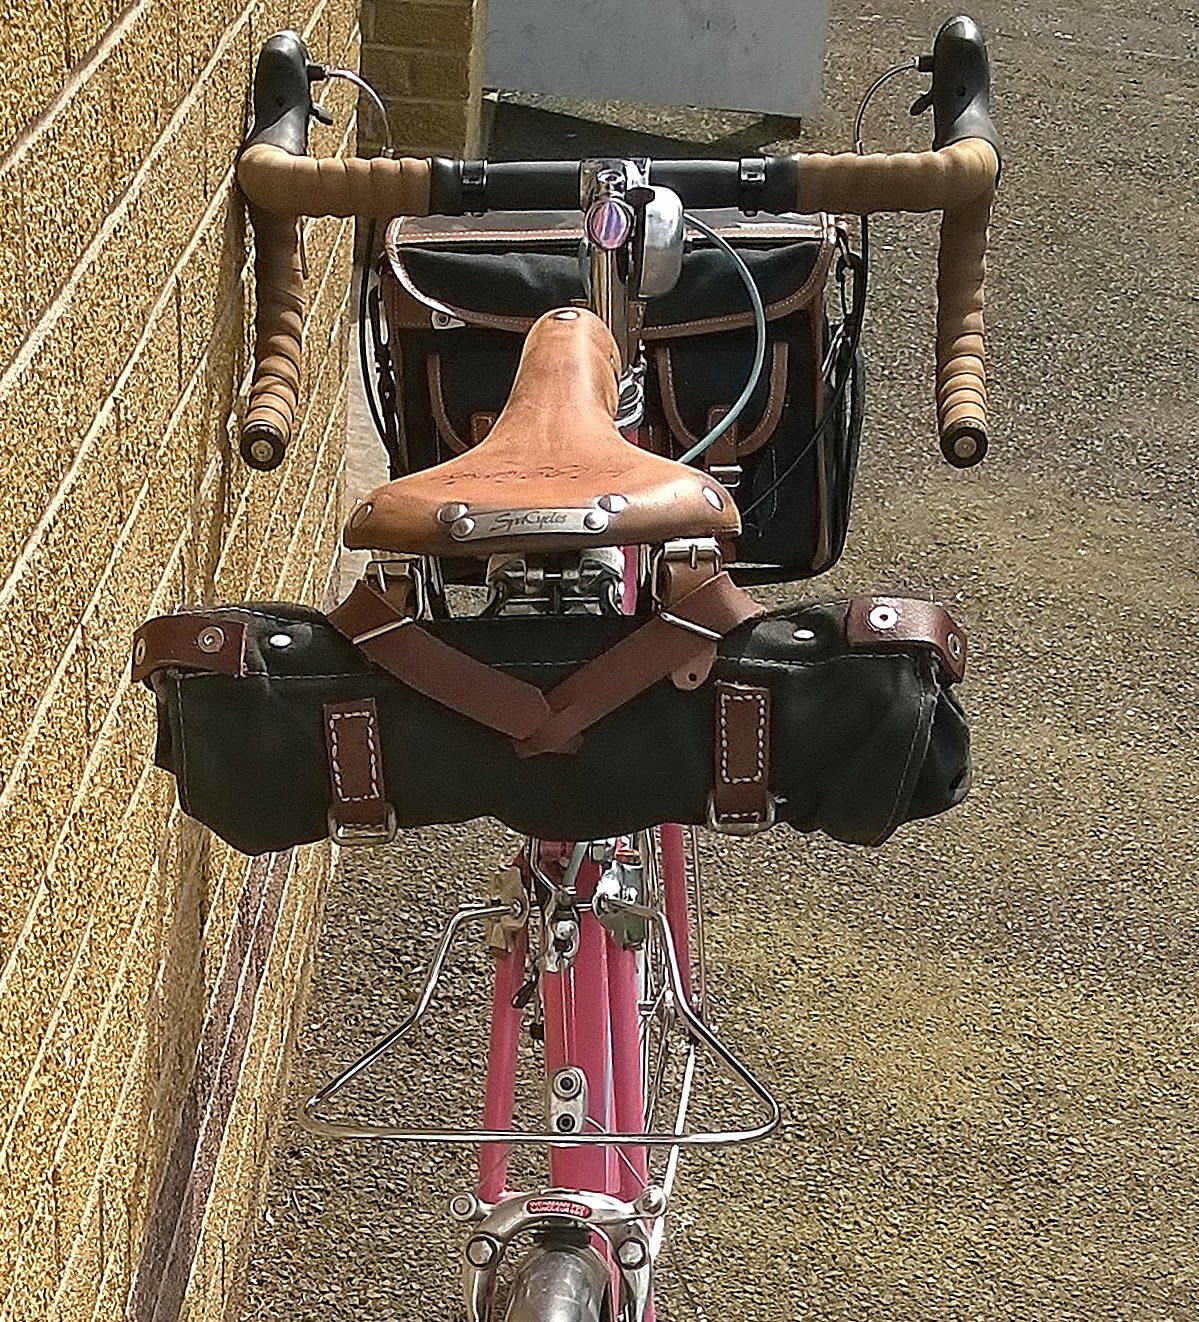
the wheels are NOS mavic MA rims i had laying around built onto large flange hubs with the usual ACI Alpina DB spokes (the best) , brakes are weinnman vanqeur 999 (original swiss made items !) 610 front 750 rear. gears are just sora 7 speed sti and tiagra rear ,alpine front, mechs , crankset is a seventies gran sport . the stem on the built bike is an 80mm zenith cinelli 1a copy and the bars are the absolutely fantastic RHM bend deda piega 26.0 mm clamp, 46cm (actually 44 C2C ) items , i love these bars , short reach shallow drop and perfectly formed for all day comfort , the saddle is an old b17n cut down to give a swallow shape but i have also added an imperial cut out , i plan on doing the same to a standard b17 in the same fashion soon , 
it also has Berthoud stainless mudguards and soon to have an ENE front rack and ironweed Orpington bag with velo orange decaleur 
the pink pig rides beautifully and as the name suggests is ultralight , built up fixed wheel sans brakes etc it weighed in at under 19lb !! not bad for a 50s built machine .

sorry about the pics, just back from an evening ride and its raining , again! 


as you can clearly see above , the box lining is very badly done ! , thats all me :-D , i have been trying my hand at using a lining wheel , the paint i use for practice is water based acrylic , once dry its pretty well fixed but a good wipe with a touch of thinner and it comes off cleanly , its a skill i would love to have and practice makes perfect

I ran into a few issues with the randonneur bag being too tight a fit with the zenith stem and the tektro rl720 crosstop levers and also the sti shifter cables , getting the bag on and off was a nightmare , first part of the solution was to use another Velo Orange classic quill stem , they are quite costly but are very high quality with great build quality and nice deep chrome plating ,not to mention the integrated bell mount brazed in boss,

it has a lot of height adjustment which gave me the clearance needed for the cross top levers and easy bag removal/fitting .
i also used a now rather old trick of utilising V brake noodles for the cable routing 

another small issue i had was that when the bag was loaded with heavier items the ENE front rack would flex and cause it to rattle on the mudguard and even bottom out the mudguard on the tyre , the solution was simple enough , a ran a small m3 hole through the rack and bolted the mudguard and rack together , i then added another stay to the front of the mudguard , it is now rock solid with the added benefit that the front brake calliper has no flex  

 above is the modified brake calliper , i drilled out the hole for the straddle cable on one side and put some old dia compe cantilever pinch bolts , the ones with the brass bush ,they prevent the end of the calliper arm from getting squashed and i can also make a straddle from any barrel end brake wire , i have a second reason though , i plan to copy the singer method of increasing brake power by using a system similar to the one pictured below (pic was borrowed from elsewhere n the web )

above you can clearly see the all the fittings , the brake ,mudguard,rack and fork are all connected at many points , i stuck a 25kg load on it to test it and it barely moved at all .
some folks might wonder why i didnt just get a bar bag with a click fix system ? , to be honest i hate them , they sit too high up ,bounce around ,look ugly and have limited load carrying unless you clamp them really tight which always damages the handlebar , by using an old style decaleur and front rack only the frame fork and wheel bare the load , not to mention how much better the chrome looks  .
.

i have also taken the opportunity  to fit daruma to the rear mudguard for a completely rattle free set up with cleaner looks .

the spa cycles leather saddle , also available in many other names , they are brooks swallow copies or imitations , they use a reinforcing substrate made from some sort of fabric which is bonded to the under side  , the leather is nice and thick but the chassis is a bit flatter across the rear than a brooks  ,  the finish is rather odd , there must be some sort of coating as it was water proof , i didnt like it as it is far too slippery so i sanded it back with some fine steel wool , the higgins logo is carved into the leather then dyed prior to sanding ,  the next three images are of the three stages of medium, fine and final extra fine steel wools, the saddle is now more of a sued finish ,i think it looks and feels great , 


The Pig with brown 700 x 30 Spicer tyres ( even at 105 psi they are very supple and comfy tyres and a genuine bargain ) the first ones were faulty as the carcase gave up and tyres bulged but the replacements have been fine since !.The addition of a home made leather front mud flap to keep the front wheel spray off the drive system


a small update , 
i am becoming rapidly attached to this bike , just as i did with the first Higgins i had , it has that 'something special' that a really good quality hand made frame can have ,  all bikes have their own character but some have that wee something that makes them stand out , its as if some bikes want to be ridden ,not just look pretty or be ultra light , rather, it has a certain and most definite ability to make you smile when you ride it , 
a few mods , campag front mech , veloflex master23 tyres , sakae prestige stem , gb bars , mafac racer brake set with dia compe gran compe real rubber hoods , all in weight is 21lb 4oz  without pedals 22lb 1 oz with pedals . I Love This Bike . 


pics taken during a wee 10 minute rest by the river almond at cramond . 
the veloflex master 25 tyres held up brilliantly , i was touch concerned they would puncture too easily due to their ultra lightweight construction . even though the rear could have done with another 20psi ,,on and off road they were great , highly recommended  
more soon !